Buttress Stabilization – Part 1
This is part one of a four part series on passenger vehicle stabilization using buttress type stabilization. The first segment will discuss criteria for equipment selection and define the 3-point stabilization technique for side-resting vehicles. The second segment will continue on the topic of side-resting vehicle stabilization in more specific detail. The third segment will introduce an analytical method for determining the forces which may be experienced by equipment components in buttress stabilization of a side-resting passenger vehicle. Finally, the fourth segment will discuss buttress stabilization techniques of a roof-resting passenger vehicle.
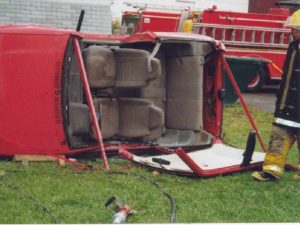
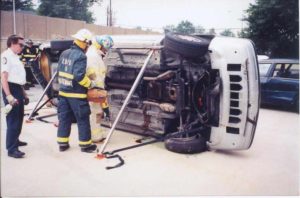
A Typical Side-Resting Passenger Vehicle
Proper vehicle stabilization is rapidly gaining attention. This is due to factors such as increased recognition of the need for patient stabilization to avoid further injury. It is also due to the increased awareness by the fire service of the dangers an unstable vehicle poses particularly with new car construction. Stabilization is a basic standard practice which makes it a requirement from a legal standpoint. This stabilization discussion focuses on the common side-resting passenger vehicle which includes cars, vans, minivans, SUV’s, and pickups. Similar techniques may apply with other vehicles, however, tractor trailer trucks, farm tractors, and other specialized vehicles require considerations which are not covered here.
Equipment Selection Criteria
The side-resting vehicle is unstable because of the high center of gravity relative to the footprint or the ground contact area. The goal of stabilizing a side-resting vehicle is to increase the effective footprint of the vehicle. Tools specially designed for this purpose contact the vehicle near the high side of the vehicle and extend downward away from the vehicle. These are referred to as buttress stabilization systems. Quite often various lengths of 4x4 wooden posts are used as simple props. Commercial products are also available which will effectively aid in the stabilization of vehicles. These include products which are used in conjunction with 4x4 wooden posts and others which incorporate adjustable steel tubes and ratchet straps. Other products used include shoring products used in the fields of 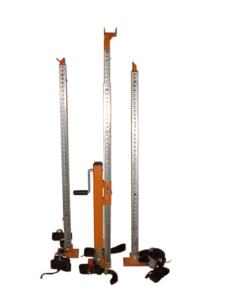 trench or building collapse. A unique product known as the Res-Q-JackTM Vehicle Stabilization System incorporates a side-wind mechanical jack for fine adjustment and tightening. Determining which buttress system is best to use depends on several variables. These include user friendliness, setup speed, strength, system versatility, available storage space, budget, and intended application. Tools that score well in these categories are tools that are patient friendly as well.
The system used must be compatible with the people using it. It must not compromise the safety of the user. It must be operable with ease in full gear and gloves. Consider also how easily the pieces go together. How much thinking is required? Can the adjustment pins be used with gloves. A small cotter pin may be difficult to handle with gloves, particularly the heavy fire glove. Is the base design directional and are multiple base restraint options available regardless of the direction the base is facing when stand is placed?
Setup time is critical. Initial stabilization, assuming a typical side-resting vehicle with light to moderate damage resting on flat solid ground should take about two minutes or less. If it takes much longer, you may not have the right equipment, or maybe you just need some more practice with it.
The stabilization tools we use are meant to hold the vehicle in the position its in when you get to the scene. In other words, we want our stabilization equipment to counteract the loads the rescue team places on the vehicle and the loads resulting from a change in the vehicle makeup as we pull things apart. This does not take all that much. I find it quite interesting that many departments will purchase shoring equipment capable of supporting the titanic at an astronomical price, yet they won’t purchase equipment designed for passenger vehicle stabilization at a fraction of the cost. Most feel that the expensive building collapse equipment will double as their vehicle stabilization equipment. It will definitely hold the vehicle, but how long is it going to take for setup? The way I see it is, if 99% of your calls requiring stabilization equipment are passenger vehicle MVA’s and the other 1% of your calls require collapse shoring equipment, the first purchase should be the passenger vehicle stabilization equipment. After you’ve got the right equipment to serve the majority of your calls, buy the big stuff if you can afford it, or call some rich neighbors in for assistance.
 3-Point Stabilization Technique
 3-Point Stabilization Technique
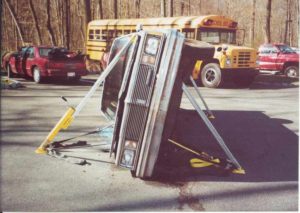
If you choose buttress stabilization equipment for a side-resting vehicle on flat ground, a minimum of three props should be applied. Vehicle condition, weight, or other circumstances may dictate that more than three props be used. Two of the props would be placed on one side of the vehicle at opposite ends, and the third would be placed on the other side of the vehicle between the two to vertically and rotationally stabilize the vehicle. For the two props placed on the same side of the vehicle, I prefer to orient them in opposing directions so as to restrict vehicle movement horizontally as well. In addition, place wedges or similar at the front and rear of the vehicle on each side. This further increases the contact the vehicle will have with the ground.
 Applying a single stand on each side of the vehicle is insufficient. Let’s assume we set a single stand on each side of the center of the passenger compartment. If you push on the vehicle at a location very near a stand, the car should feel quite stable. However, if we push at the very front of the vehicle or the very rear, you may be able to actually rotate the vehicle enough to topple the stands. In addition, applying just two stands both to the least stable side of the vehicle is a poor practice. When first applied, all may seem well, however, as we will discuss later, the physical properties of the vehicle as a structure, and the loads we place on it will change throughout the extrication. Neglecting to apply a third stand on the opposite side of the vehicle may allow the vehicle to roll to that side, or simply wiggle enough to loosen a stand’s purchase.
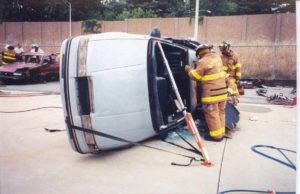
 The selection of the side to use for placement of the two props and the side to use for the placement of the single prop depends on the situation, the available purchase points, the versatility of the stabilization equipment, the workspace required, and the rescue team’s preference. When possible, place one stand at the base of the ‘A’ post on the passenger compartment side. Place the other two stands at the undercarriage side of the vehicle being sure to keep the single stand on the passenger compartment side between these two stands. Several advantages here include less equipment on the active side of the vehicle and the multiple purchase points available at the under-carriage side of the vehicle. Roof removal is not hampered by this technique. The cut at the ‘A’ post is simply made above the stand purchase point. Note that the single stand need not be centered between the opposite two stands, it only needs comply with the term “between” which may mean only inches from being directly across from one stand and a few feet from the other. Think of the two stands as goal posts, and the single jack stand as the ball. The objective is to get the ball between the goal posts with the target being the center, but a score is a score. Alternatively, two stands could be placed on the passenger compartment side, and a single stand at the undercarriage side.
Place the stands at a 50 to 70-degree angle. Debris may be in the way of placing the stand at exactly 70 degrees, so place it at 50. Don’t waste time on it, just set it securely. Later in the series, a means of determining the approximate forces in the stands relative to stand angle as well as many other variables will be presented.
In the next segment, we discuss buttress end fittings, base restraints, and various accessories which will aid in the stabilization process.
If you would like additional information on the equipment used in this article, you may access the following web site: www.cepcotool.com or you may write to: Cepco Tool Company, Post Office Box 700, Spencer, NY 14883. © 2001, Cepco Tool Company.