Buttress Stabilization – Part IV
This is part four of a four-part series on buttress stabilization equipment and techniques. The previous segments covered quite extensively buttress stabilization of the side-resting passenger vehicle. Here we will explore buttress stabilization of a roof-resting passenger vehicle. The basic concepts we covered in the previous sections regarding buttress stabilization hold true here and will not be restated.
 Buttress Stabilization of a Roof-Resting Passenger Vehicle
A roof-resting passenger vehicle can be a difficult situation in terms of stabilization. In any stabilization effort we want quick and simple solutions. Time spent on stabilization is time not spent on extrication and patient care. What is often overlooked is that most of the quick and simple techniques interfere with the passenger compartment, thus limiting extrication options. Many of these techniques involve attaching restraint straps to the rear posts or running straps across the door up to the undercarriage. Another problem with the roof-resting car is that the locations you most desire to place your stabilization stands are the least conducive to a good purchase. In many situations, the engine weight of the car keeps the nose down and the rear up leaving a sloped slippery surface with little for a prop tip to engage. Later, we will introduce a new technique which is actually quick, simple, requires no search for prop purchase, and leaves the passenger compartment free from obstruction keeping access options open.
 The rear of a typical sedan, for example provides very few solid locations for stand engagement. Examples of areas which will typically lend themselves to purchase include fender light knockouts in fenders, gas fill openings, rear trunk walls, taillight knockouts, and some bumpers or bumper supports. Usually you can punch out the rear fender lights and you are left with a hole in the fender. Depending on vehicle condition as a result of the crash, rust, or material composition you may be able to gain a purchase sufficient to remove “play” in the vehicle, however, if vertical support is necessary this could be a problem with sheet metal or plastic if the fenders will be your only purchase. If you open the gas fill door you will find a good purchase.
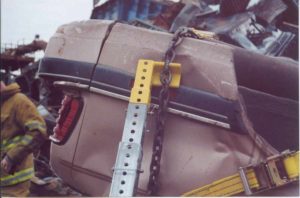
Unfortunately, you only have these on one side although I’ve heard of vehicles with them on two sides, but that is a rare exception. I would suggest you leave the fill cap on so that we avoid creating any more trouble. If fuel is leaking, this will have to be addressed. Setting the metal stand against a metal fender could possibly cause ignition. The rear trunk wall usually provides a good grip for a channel type end fitting. However, getting to it can often be difficult unless the trunk lid is gone. Bumpers come in many shapes and materials. Some are strong, some are weak. Bumper supports vary considerably as well. Be sure you know that whatever you engage can support the load you apply.
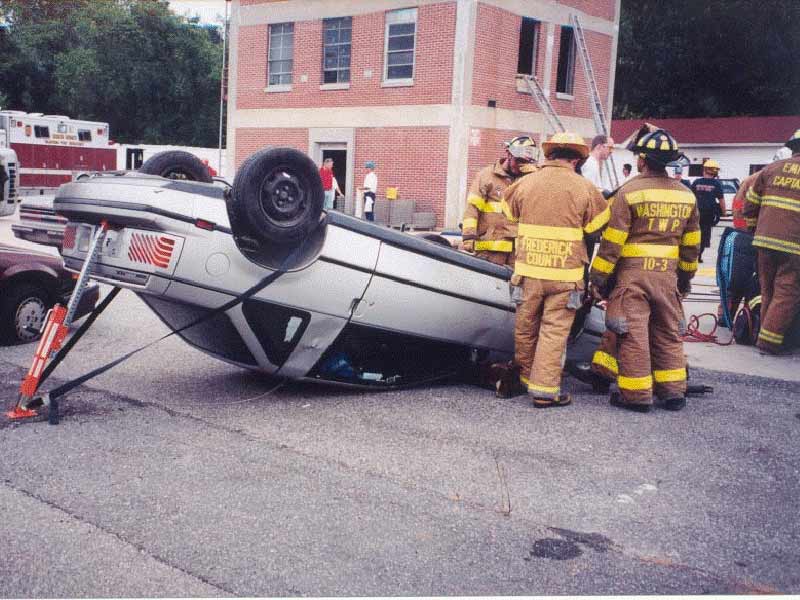
One technique which is very quick to employ, is a single stand centered in the rear, in conjunction with step blocking or wedges in front of the ‘A’ posts. This basically provides three points of stabilization. However, two of the points, the wedges, are low relative to the center of gravity of the vehicle and do little to increase the vehicle “footprint”. Note that we have a much lower center of gravity in comparison with a side resting vehicle as well as a wider footprint to start with. The wedges do, however increase good solid ground contact. Advantages to this type of setup is that the prop purchase is typically a solid one with the rear trunk wall or a solid bumper, and the base is well restrained. There are several disadvantages with this type of setup. To restrain the base properly, the straps are either hooked at the rear posts, or run up the sides to the undercarriage. Attaching to the rear posts can in some situations cause difficulty in roof removal. Straps that run up the sides in front of the doors limit access from the side. In addition, the stand itself is centered in the rear of the vehicle hampering access to the rear window.
Another method is to apply a stand at each fender again with wedges in front of the ‘A’ post. With a good purchase this can be sufficient stabilization. With this setup, the base strap of one stand is connected to the opposite stand base. Disadvantages with this setup include the purchase difficulties mentioned earlier, along with the fact that the bases are not restrained as completely as possible. If the vehicle can be restrained from sliding, the lack of sideward base restraint most likely will not be an issue. An advantage to this setup is that the passenger compartment is left relatively unobstructed.
A very solid technique is to combine the previous two methods. Now you have a stand at both rear fenders and a stand at the rear center along with the wedge cribbing at the ‘A’ post. Restraint straps can be configured in a few different ways. One strapping configuration is to strap the fender stand bases to each other independent of the rear stand, and to strap the rear stand base to the rear roof posts using ‘J’ hooks. Another way to strap is to strap the rear stand to the fender stands, and then strap the fender stands to the rear post. In addition, the fender stands could be strapped to each other. In this situation, the straps connected to the rear posts could be moved to the front of the vehicle to leave the passenger compartment unobstructed. The final strap configuration noted keeps our extrication options open, however we are still left with the difficulty of finding quick and solid stand engagement. Note that the stabilization may start with either of the previous two methods discussed and end up here by adding the missing components.
 The next roof resting stabilization method was developed with the following goals in mind:
- Provide universal stand engagement at fenders independent of vehicle construction, material, and design.
- Keep patient access free from obstruction.
- Keep all possible extrication options available.
- Provide solid stabilization.
- Simple to understand.
- Quick setup.
Well, it has taken some time, but we may be as close to these objectives as we are going to get. The technique developed at Cepco Tool Company involves the following simple steps:
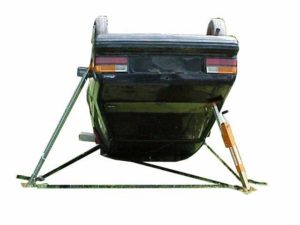
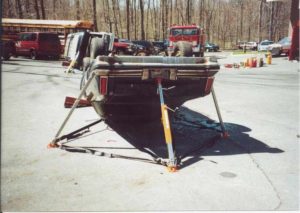
- Lean buttress stands with special chain grab end fittings against each rear fender.
- Run chain under rear of vehicle from one stand to the other with slack extending up to undercarriage on each side.
- Tighten slack and pull end fittings to fender using a ratchet strap from one end of chain to other end of chain at undercarriage. Note: If there is a concern about ratchet strap coming into contact with a hot exhaust or similar, binding of chain may be done beneath across trunk lid. In addition, the strap binding the chain may be substituted with a chain binder, come along, or similar.
- Restrain chain from sliding off rear of vehicle by attaching a ratchet strap to chain near trunk lid and running up to undercarriage in front of wheel assembly (swing-arm pivot point may be suitable).
- Attach a ratchet strap at bases and tighten.
- Place wedges or similar in front of each ‘A’ post.
 On paper, it sounds like a lot of steps. However, in practice it takes about two minutes to accomplish. There is little thinking required in terms of deciding how to set the stands, how to gain purchase with the vehicle, or how to keep stabilization from interference with patient access/extrication.
If a third stand is desired at the rear center of the vehicle, it may be added at any time. In this case the straps of the third stand may be attached to the bases of the fender stands. In addition to the fender stands being strapped to each other, straps would be run from the fender stand bases up to the front of the vehicle. This configuration would keep the passenger compartment free from strap attachment.
The techniques described here will not always fit the situation. Ground conditions, obstructions, vehicle type, or vehicle condition may prevent stabilization as described. However, the methods presented here give the rescue team a good starting point to work from.
If you would like additional information on the equipment used in this article, you may access the following web site: www.cepcotool.com or you may write to: Cepco Tool Company, Post Office Box 700, Spencer, NY 14883. © 2001, Cepco Tool Company.